

Top Viewed Articles
Home Comfort Tips

I invite you to explore my YouTube channel, where you'll see first-hand how insulation looks in dark and mysterious attics, crawl spaces, and basements scattered across Maryland. Witness first-hand how we tackle the unique challenges found in these hidden spaces, and gain valuable knowledge on how to conquer your own house.

Insulation Video Library
Like this article?
Get two free guides:
Replacement Window Report &
Home Efficiency Report
Join a community!
Learn how to move the
home comfort needle!

Save Energy
Effective Tips
From a Certified Pro
Energy Auditor
![]()

Eric Gans
Certified Energy Auditor
Residential Comfort & Energy EfficiencyMonday, May 12 2025
 If you’ve ever walked into a room in your home and thought, “Why is it always freezing in here?”, you’re not alone. And the answer isn’t always what you think. I was recently called out to a home in Maryland to do a complete energy audit for a family dealing with, you guessed it, cold floors, uneven temperatures, and high energy bills. It wasn’t a huge home, and from the outside, everything looked normal. But what I found inside told a completely different story. The Setup: Drafty Room, High Electric Bills, and Suspicion About the Crawl SpaceWhen I arrived, the homeowner mentioned that their electric bill had soared over $1,100 during the winter. And the kicker? They weren’t even using the entire house. That’s when I started digging, literally and figuratively. We ran a blower door test to see how leaky the home was. The air just poured through. But where it was leaking from… that’s where things got interesting.
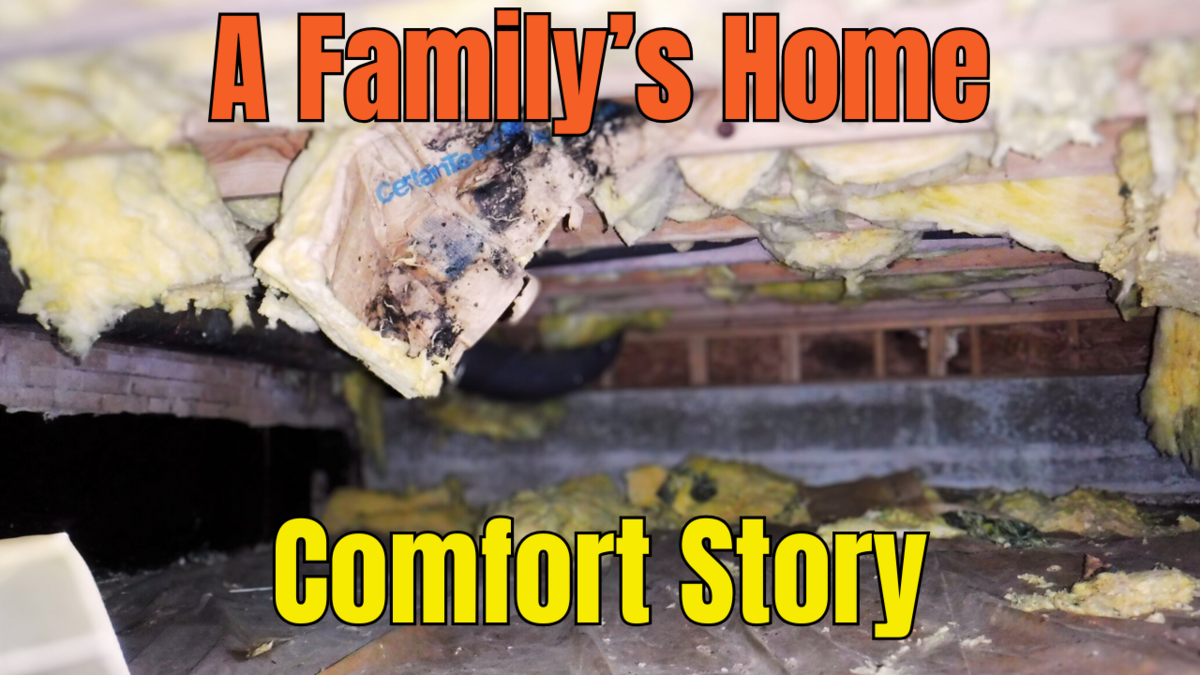
The Crawl Space: Moisture, Gaps, and Unwanted GuestsThe crawl space wasn’t fully open but wasn’t encapsulated either. The homeowner thought it was semi-conditioned, but it was in limbo. There were signs of past rodent activity, visible air movement through cracks, and a vapor barrier that had been mostly sealed but not completely. The biggest problem?
When I say I could touch the back of the aluminum siding from inside the house, I mean it.
This wasn’t just an insulation problem. This was a major connection point to the outside and a straight shot for cold air infiltrating the home. No wonder they had high energy bills. Stack Effect in ActionUpstairs, I found classic signs of the stack effect. An invisible force where hot air rises and escapes through the top of your home, pulling cold air up from the bottom. You could feel the airflow at the recessed lights and attic access hatch. Even the insulation looked as if it had been shifted by the wind, a phenomenon known as wind washing, which was happening above the daughter’s bedroom. The wind had pushed the insulation away from the edges, exposing the ceiling and causing severe temperature fluctuations.
The Real Fix: Sealing the Bottom AND the TopHere’s what we recommended, and why it works: Crawl Space Encapsulation:
Attic Improvements:
Bath Fan Venting:
Unexpected Bonus: Loose Duct DiscoveredWhile inspecting the attic, I found an unsecured elbow joint on a duct supplying a second-floor bathroom. It was barely attached and likely leaking heated air into the attic. We reconnected it, but it must still be sealed and appropriately fastened to improve duct pressure and conditioned air delivery. The Bigger Picture: What Makes a Home Truly ComfortableYou can buy the best HVAC system in the world, but it'll never feel right if your home leaks air like a sieve. Insulation is only part of the equation. Air sealing is the hidden hero, and it’s almost always overlooked. If You Live in an Uncomfortable Home, Start HereYour home isn’t broken, it’s just misunderstood. That’s what energy audits are for.
And with rebates available through Maryland's BGE & PEPCO Home Performance with ENERGY STAR® program, many of our recommended improvements qualify for thousands in incentives. Book your $100 home energy audit now Let’s find the comfort you’ve been missing, hiding in plain sight. Tuesday, April 29 2025
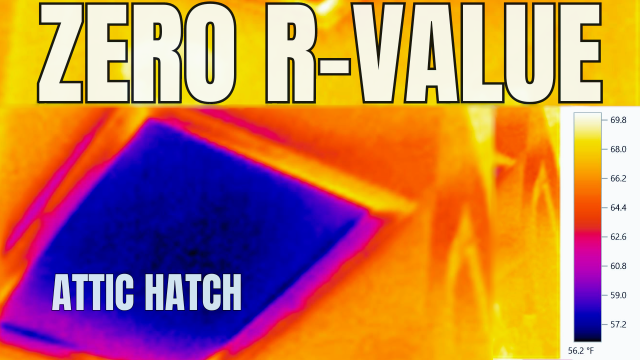 Written by Eric Gans, Building Analyst & Envelope Professional Does one room in your home always feel too hot or too cold?The problem might be your attic hatch — a small, often overlooked gap that could be quietly sabotaging your home’s comfort and efficiency. In this step-by-step DIY guide, I’ll show you how to seal and insulate your attic hatch using rigid foam board and a few affordable tools. It’s a quick project with a big payoff in any house that has an access panel connected to an attic. It might be on the ceiling or a wall.
Why Insulating Your Attic Hatch MattersYour attic hatch may look like a minor detail, but it can have a significant impact on your home’s thermal performance. If left uninsulated or poorly sealed, it creates a weak point in your attic’s defense system. Here’s what happens when it’s ignored:
For example, in a 1,000 sq. ft. attic, just 18 sq. ft. of missing insulation at the hatch can reduce the R-value from R-17 to R-13.
Tools & Materials You’ll NeedThese are the exact tools and materials I use and recommend in the video. The links below are affiliate links — I earn a small commission if you purchase through them (thank you for supporting my work!).
Also, grab a:
Step-by-Step: How to Seal and Insulate Your Attic Hatch1. Inspect Your Existing HatchPop it open and see what you’re working with. You may find:
Either way, you can improve it — and now’s the time.
2. Clear & Prep the Surface
3. Measure & Cut the Foamboard
Stack the layers until you reach the desired R-value. In Maryland, I used four layers to achieve an R-52 rating. 4. Attach Insulation to the Hatch
This ensures the insulation stays in place, even when accessing the attic repeatedly. 5. Apply Foil Tape for Durability
6. Install Weatherstripping
A tight seal here prevents air leakage, especially during the winter stack effect.
Pro Insight from an Energy AuditorIn my years of performing energy audits in Maryland, I’ve walked into countless homes where a single room felt noticeably colder or hotter. Almost every time, the culprit was right above — the attic hatch. If you see:
Fixing it with a DIY project like this one is one of the most cost-effective upgrades you can make. Want to See It In Action?Watch the full video on YouTube:
It includes:
If You're in Maryland…Schedule your $100 Home Energy Audit using this calendar:
Final ThoughtsSealing your attic hatch is one of those “small hinge, big door” projects. It doesn’t take long. It doesn’t cost much. But it pays you back in comfort, efficiency, and peace of mind for years to come. Start here — and take back control of your home’s comfort. As an Amazon Associate, I earn from qualifying purchases. This helps support the channel and allows me to continue creating content that helps homeowners take control of their energy use and comfort. Thank you! Friday, April 25 2025
 Written by Eric Gans, Building Analyst & Envelope Professional
Did you know that at any given time, there are around 40 contractors approved by BGE & PEPCO to perform energy audits across Maryland? Sounds like a lot of options, right? But here’s the reality:
Now and then, I get a call from a Maryland homeowner who has already had their audit done but wants a second opinion. When that happens, and they authorize it, I can access their previous file through the BGE/PEPCO system. And to be totally honest? I’m amazed at how many audits I review that barely scratch the surface. Some are missing key findings. Others are just boilerplate. Very few include real-world insights that empower the homeowner to make informed decisions. A great energy audit isn’t about checking boxes—it’s about telling the story of your home. And to do that well, the person holding the clipboard needs more than just a license.
So, how do you make sure the person showing up at your house is the right one? Start by asking these five questions—yes, even if you’re talking to me.
|


