Residential Comfort & Energy EfficiencyTuesday, April 29 2025
Written by Eric Gans, Building Analyst & Envelope Professional Does one room in your home always feel too hot or too cold?The problem might be your attic hatch — a small, often overlooked gap that could be quietly sabotaging your home’s comfort and efficiency. In this step-by-step DIY guide, I’ll show you how to seal and insulate your attic hatch using rigid foam board and a few affordable tools. It’s a quick project with a big payoff in any house that has an access panel connected to an attic. It might be on the ceiling or a wall.
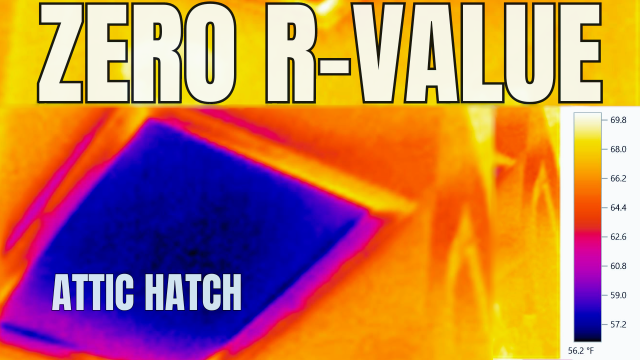
Why Insulating Your Attic Hatch MattersYour attic hatch may look like a minor detail, but it can have a significant impact on your home’s thermal performance. If left uninsulated or poorly sealed, it creates a weak point in your attic’s defense system. Here’s what happens when it’s ignored:
For example, in a 1,000 sq. ft. attic, just 18 sq. ft. of missing insulation at the hatch can reduce the R-value from R-17 to R-13.
Tools & Materials You’ll NeedThese are the exact tools and materials I use and recommend in the video. The links below are affiliate links — I earn a small commission if you purchase through them (thank you for supporting my work!).
Also, grab a:
Step-by-Step: How to Seal and Insulate Your Attic Hatch1. Inspect Your Existing HatchPop it open and see what you’re working with. You may find:
Either way, you can improve it — and now’s the time.
2. Clear & Prep the Surface
3. Measure & Cut the Foamboard
Stack the layers until you reach the desired R-value. In Maryland, I used four layers to achieve an R-52 rating. 4. Attach Insulation to the Hatch
This ensures the insulation stays in place, even when accessing the attic repeatedly. 5. Apply Foil Tape for Durability
6. Install Weatherstripping
A tight seal here prevents air leakage, especially during the winter stack effect.
Pro Insight from an Energy AuditorIn my years of performing energy audits in Maryland, I’ve walked into countless homes where a single room felt noticeably colder or hotter. Almost every time, the culprit was right above — the attic hatch. If you see:
Fixing it with a DIY project like this one is one of the most cost-effective upgrades you can make. Want to See It In Action?Watch the full video on YouTube:
It includes:
If You're in Maryland…Schedule your $100 Home Energy Audit using this calendar:
Final ThoughtsSealing your attic hatch is one of those “small hinge, big door” projects. It doesn’t take long. It doesn’t cost much. But it pays you back in comfort, efficiency, and peace of mind for years to come. Start here — and take back control of your home’s comfort. As an Amazon Associate, I earn from qualifying purchases. This helps support the channel and allows me to continue creating content that helps homeowners take control of their energy use and comfort. Thank you! Comments:
|


